About Attributes
Attributes represent data to capture for a unit or on a transaction. There are several pre-defined system attributes. Many of the system attributes are used for standard reporting. Attribute assignments are available to be defined for transactions, item templates, container setup, project templates, shipping templates, and maintenance templates. Attributes can be added at any time; however, it is advantageous to have the attributes defined and setup prior to setup and determine where they will be assigned.
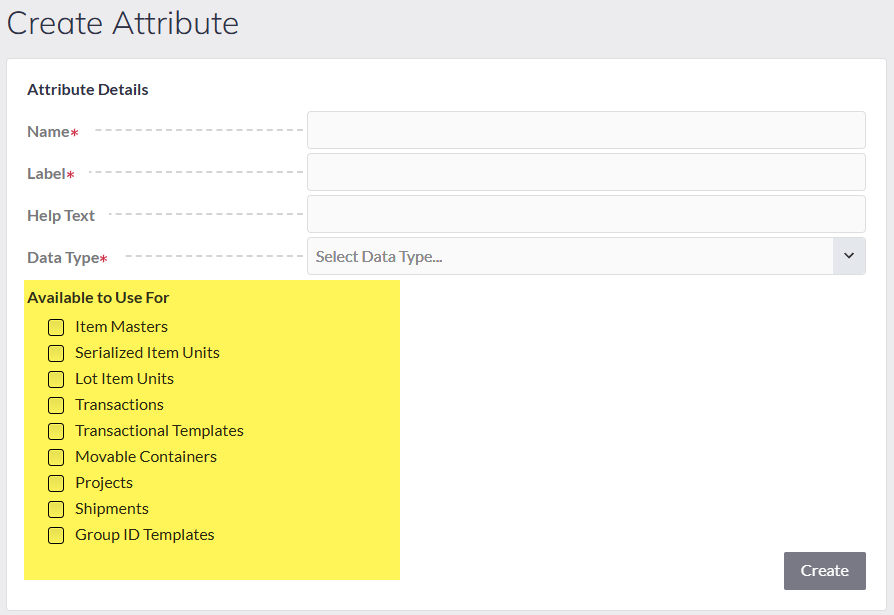
Create a New Attribute
To create a new attribute, go to Settings on the left menu bar and select Attributes. A grid view with the list of current attributes will be available to review. Select [New Attribute] button to open the create screen.

- Name. This is the database name for the attribute.
- Label. This is the display name for the attribute. The Name and Label can be the same.
- Help Text. This is optional to setup. When help text is entered, it is displayed under the attribute field when presented in a transaction. Shorter field labels can be used and a broader description of what data to capture can then be defined under the help text.
- Data Type. Assign the data type for the attribute. Current available options include:
- Text
- Date
- Integer
- Memo
- Dropdown List
- Text Editor
- Checkbox
- DateTime
- Currency
Where Attributes Can Be Assigned
When creating new attributes, define where the attribute can be used. This will limit what attributes are available to select to avoid confusion over the intention of the attribute use.
- Item Master. These are attributes assigned to the item master record. Data associated with the item master is standard information that will always apply to that item code. Examples include a model or manufacturer.
- Serialized Item Units. These are attributes specific to each individual item and only applies to serial-tracked items. Examples include a serial number or warranty end date. Data that needs to be associated directly to the individual item record. There are some system attributes available to select from:
- SystemWarrantyEndDate
- SystemWarrantyStartDate
- SystemSerialNumber
- Lot Item Units. Like serialized units, these are associated with the item-lot combination. It is important to note that the attribute data assigned to the item-lot combination is inherited for that item-lot if additional quantities are added. For example, if an attribute of the color blue is assigned to ITEM-A, LOT123; if adding more of this item-lot to the system later, the attribute ‘color’ will display as read only with the value of ‘blue’.
- Lot Expire Date and Lot Manufacture Date data are system fields and are enabled by the item template rule. Therefore, there is no need to create attributes to represent this data.
- Transactions. Many transactions support the ability to assign header-level attributes related to the transaction. For example, a Vendor Packing List Number may be created to capture on PO Receiving or Receive New Unit transactions. Current available transactions that can be setup include:
- Receive New Unit
- PO Receive
- Check Out
- Check In
- Receive Transfer
- Usage
- Unit Return
- Deploy Unit
- Order Pick
- Transactional Templates. Attributes are used to create forms and checklists. For example, Place-In-Service and Unit Maintenance have additional setup templates that are created where the data attributes can be used to create a corresponding form to present to users.
- In addition, attributes can be enabled to capture on transactions based on the item category (setup under attribute tab>>transaction on item templates). Attribute data is captured related to the items to build historical data. An example is the ability to capture a condition on the check in transaction for specialty equipment. A history report can then be created to view the historical condition for that item. Currently the following transactions can be selected:
- Create
- Receiving
- Allocate to Project
- Build Shipment (as item being added to the shipment)
- Build Unit (for the Master unit)
- Check In
- Check Out
- Deploy Unit
- Dispose Unit
- Maintenance
- Place-In-Service
- Retire Unit
- Return Unit
- Transfer Ownership
- Transfer Site Location
- Usage
- In addition, attributes can be enabled to capture on transactions based on the item category (setup under attribute tab>>transaction on item templates). Attribute data is captured related to the items to build historical data. An example is the ability to capture a condition on the check in transaction for specialty equipment. A history report can then be created to view the historical condition for that item. Currently the following transactions can be selected:
- Movable Containers. Attribute data can be added to capture on movable containers since movable containers are also serialized units.
- Project and PO Number reference data is managed using a container template rule option.
- Projects. When setting up different projects or jobs, additional attributes can be defined for additional data. Some examples may be a Contract Number or Billing Accounts. Standard fields available on projects include: Customer and Location. There are some system attributes available to select from:
- SystemProjectStartDate
- Shipments. Shipment templates are required when using transfer or customer orders. Shipment templates provide the ability to create additional data based on the type of shipment. There are several system-level attributes available for shipments supporting standard reporting that include:
- SystemBOLNumber
- SystemFreightBillTo
- SystemFreightChargeTerms
- SystemShipDate
- SystemSpecialInstructions
- SystemUNNumber
- Group Templates. The grouping features allows selection of serialized items to be tagged with a group ID for reporting purposes. The typical use of grouping is to group assets based on the financial asset record ID based on a one-to-many option. For example, 30 laptops are received under a specific purchase order. There is one financial record for this group of assets with the total cost setup for depreciation. The asset record is setup as the Group ID and each individual laptop is tracked in Panatracker. This supports meeting any audit requirements. Additional data may also be added to track for the group by adding it to the template setup.