Note: An Ethernet enabled printer is highly recommended for use with PanatrackerGP as it will allow for the most reliable label printing setup.

If you are using a Zebra printer, download and Install Zebra Setup Utilities.
Zebra Setup Utilities is free software that is used to initially configure your label printer, allowing you to give the label printer an IP address.
Download Zebra Setup Utilities here
1. Setup the printer with a Static IP Address (consult your printers users guide for information on how to complete this. If using a Zebra printer, use the above Zebra Setup Utilities)
2. Download the driver for your printer from NiceLabel.
3. Run the installer
4. Unzip the files
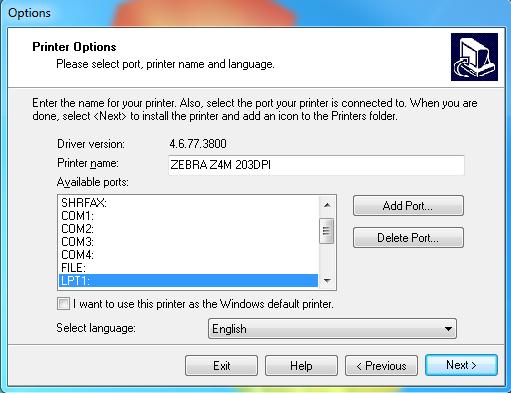
5. Select the printer you are installing
6. When you get to printer options give the printer a name (shorter, simpler names are easier to reference from the handhelds)
7. Select Add Port
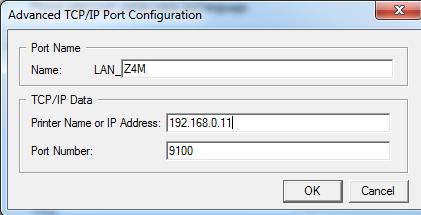
8. Fill in the Name, IP, and Port Number
- Wired printers use port 9100
- Wireless printers use port 6101
9. Select Ok then Next
10. Click Finish
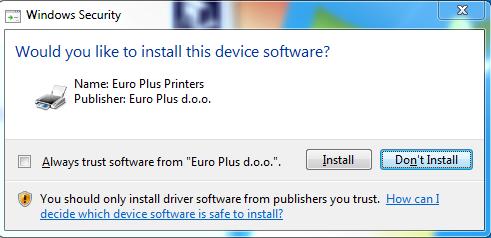
11. Click Install
12. Go to Devices and Printer and print a test page of the printer you just added.
Many of the transactions performed on the PanatrackerGP handheld application can cause a label to be automatically generated and printed. This is currently done utilizing the NiceLabel Network software, with the 5 User Suite being the most commonly sold variant of the NiceLabel Network software.
Installing NiceLabel Network
It is preferred that the installation and initial configuration of the NiceLabel Network Suite and LabelPrinting shared folder are completed by you (the customer) prior to the installation of PanatrackerGP.
Download the NiceLabel Network Installation ZIP File
NiceLabel Network consists of two parts: the server and the workstation.
First, you must install the server portion of the labeling software on the server and make all files
accessible to the clients. This is typically done by creating a folder named ‘LabelPrinting’ on the root of a drive and sharing it with everyone. Once this folder is created, install the NiceLabel Network server portion to this folder.
After the server portion is installed, you will be prompted to run the workstation installer on the server. This install will install NiceLabel Pro and NiceWatch, both required for automated label printing. Choosing the full installation option when prompted will install more applications than is typically needed on the server. Instead, we suggest choosing ‘Custom Installation’ and only installing NiceLabel Pro and NiceWatch.
- NiceLabel Pro is the design software that you will use to create and modify your labels. Automatically printed labels utilize ‘Label Definitions’ with the PanatrackerGP transaction values (i.e., Item Code, Item Description, Serial/Lot Number) predefined placeholder variables.
- NiceWatch is a sentinel application programmed with a trigger to watch a specified file directory. When a transaction is submitted in PanatrackerGP, a “. job” file is created in this assigned directory. NiceWatch opens this file, reads the data, and plugs it into the respective placeholder variables for the label definition file indicated in the header of the .job file.
Download the NiceLabel Pro user guide if you need further assistance.
Please note that after installed, the NiceLabel software will be marked as evaluation (demo) versions. You will receive an activation key from Panatrack during the installation of PanatrackerGP. If you would like this key earlier, please let us know.
NiceLabel Network System Requirements
- 32-bit or 64-bit Windows Server 2000, XP, 2003, Vista, Server 2008, 7, 8, 8.1, Server 2012, Server 2012 R2
- Hard disk with 160 to 550 MB of free disk space (depending on the installation options)
- Support for OLE DB database drivers. Recent Windows operating systems have included OLE DB database drivers. If your operating system does not have the database support, the installation wizard will prompt you to install it.
- Administrator rights to the server and each workstation during installation
- Computer acting as a server. Any server operating system that allows file sharing
with Windows system (any Windows, UNIX or Netware) - Each client must have granted full access (read, write, delete) to the System folder
on the server Local Area Network (LAN)
Panatrack provides item label printing templates to support the automated label printing infrastructure. It is best to keep the label simple without a lot of text. The barcode carries the information in a very efficient manner. Let the barcode do the work.
PanatrackerGP label templates are defaulted with the following three variables:
1. Inventory items – Tracked by quantity only (bulk):
- Dynamics GP Item Number (barcode format)
- Item Description (text)

2. Inventory items – Serial tracked:
- Dynamics GP Item Number (barcode format)
- Item Description (text)
- Serial Number (barcode format)

3. Inventory items – Lot tracked:
- Dynamics GP Item Number (barcode format)
- Item Description (text)
- Lot Number (barcode format)
- Variables including manufacturer date, expire date, and the GP lot attributes are recommended if that data is collected

While other variables are available to add to your label definition, Panatrack recommends keeping your label details simple. Do not add variables that will change throughout the life cycle of that inventory item, such as location assignment.
As part of the standard implementation, Panatrack will make basic set up adjustments to the label template set up, such as centering adjustments to the label media size selected. If you prefer a more customized label, we are more than happy to write that service into your contract.
Default Templates & Automated Item Label Printing
Currently, all transactions that support label printing within the PanatrackerGP application share the same item label template file. Automated item label printing is supported on Receiving, Add Adjustment, Assembly, Site Transfer, Bin Move, and Create Production Unit (for Manufacturing).